Using ambisonic audio equipment to create realistic, motion-affected soundscape
FB 360 Workflow
By: Andrew Polino
Work:
1. Install the FB360 Spatial Workstation and also (if you’re using Windows) Python and GPAC.
2. Go to the ‘FB360 Spatial Workstation’ folder. There are subfolders containing templates and plugins for Pro Tools HD, Nuendo, and Reaper. Inside the Reaper folder is a file called ‘SpatialWorkstation.RPP’. This file opens Reaper and a workstation designed for FB360 audio projects, with all the necessary plugins and setup already done!
 *Note: Each track in ‘SpatialWorkstation’ comes with a handy ‘note’ attached to each track, identifying what it’s for and how you can use it. This is incredibly useful, though you do have to delete each ‘note’ from the track before you can populate it.*
ALSO DON'T FORGET TO 'SAVE AS' WITH A NEW PROJECT FILE-NAME EACH TIME YOU USE THIS!
3. In the first spatial track (‘Spat 01’), drag and drop the audio track from the 360 video file you’re using (recorded by the camera’s internal mic, most likely a regular stereo track).
*Note: This isn’t a requirement for the final mix or even for the editing process, but it’s a helpful point of reference for syncing the audio tracks from your Brahma-in-Zoom mic with the video, ESPECIALLY if you have a clear ‘marker’ sound (like a ‘clap’) at the beginning. Be sure the audio is lined up exactly at the ‘0.00’ time mark before you proceed.*
4. In the second spatial track (‘Spat 02), drag and drop the 4-channel wav file you converted from Brahma Volver.
5. Among the icons in the upper-left corner of Reaper, click the ‘Disable Snap’ icon 
6. Next we need to let the FB360 Spatializer know what kind of audio tracks it’s converting into a spatial soundtrack (in this case, a stereo track for ‘Spat 01’ and a 4-channel B-format track for ‘Spat 02’). To do this, click the green “FX” button on each track

This will take you to the Audio 360 Spatializer. The plugin is very user friendly, and allows you plenty of adjustments and effects to experiment with. The most important one however is the ‘Input’ option at the top. You must select the correct format from the dropdown menu that matches the audio track. In this case, I set ‘Spat 01’ to “Stereo” and ‘Spat 02’ to B-format (FuMa) (This is the format Brahma converts your 4-channel audio to).
Now you can test out the ambisonic mix against your video on GoProVR, and play around with the other Spatializer settings until you’re happy with the mix. Then highlight the finished soundtrack from beginning to end (You can make it easier by clicking on ‘Insert’ and selecting ‘Marker’ to mark the endpoint)
**NOTE: As an optional step, you can add non-spatial Stereo tracks into your mix, using the Head-locked Stereo tracks (colored green). These will allow you to overlay a soundtrack that will NOT be spatialized. This is ESPECIALLY useful for music and any kind of voice-over (narration, sound bites, etc).**
7. Now click on the ‘3D Master’ track (it should change from dark red to light pink). Then go to ‘File’ and select ‘Render’.

-
Make sure to set ‘Source’ to ‘Stems (selected tracks)’ and ‘Bounds’ to ‘Time selection’
-
Make sure you give the ‘Output’ file a recognizable name and destination.
-
Set the Sample rate to ‘48000’
All other settings can be left as is. Click on ‘Render 1 file…’
*NOTE: If you’re mixing Head-locked Stereo tracks per above, you have to render the ‘HL Master’ track (turquoise) separately using the same render steps/settings above. Both tracks will be added separately to the mix using the FB360 Encoder*
8. Now open the FB360 Encoder (Go to the ‘Encoder’ subfolder in the ‘FB360 Spatial Workstation’ folder and open ‘FB 360 Encoder.exe’)
*Note: Windows users, be sure to click ‘File’ and choose ‘Check FFmpeg’. If you’ve installed Python and GPAC, the check should be successful. If it fails, just follow the instructions to direct the program to the Python and mp4Box .exe files. Then you should be good to go*

When you have everything lined up, click “Encode” and make sure you can easily identify the name and location of the fully encoded video file. This is what you’ll be uploading onto Facebook.
*NOTE: You can also switch the “Output Format” to ‘YouTube Video with 1st order AmbiX’. This will allow you to encode a video file that will upload to YouTube. But bear in mind that you can’t do this if you have Head-Locked Stereo tracks (they won’t transfer), and that some of the sound mix quality will be lost in the conversion. HOWEVER there is another workflow that will allow you to make your own 4-channel AmbiX mix. I'm hoping to master this workflow for the next iteration*
Next Steps
Fine-tune the process for more advanced and layered sound editing
Provide the most high-quality encoding options for all non-Facebook platforms (YouTube, etc)
Take much more advantage of the many plugins and 'tinkering' tools the Spatial Workstation offers
Create alternative workflows for different Ambisonic plugins (Ambisonic Toolkit i.e.) that are less user-friendly but offer greater control.
Feedback
Setting up an editing station
By: Andrew Polino
Work:
This editing station accounts for all the hardware and software I need for recording and editing spatial audio.
1. For recording and converting the audio: 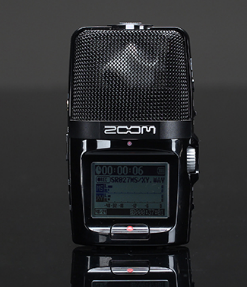 The Brahma-in-Zoom 4-Channel Mic with Brahma Volver conversion software included
2. For syncing, editing, and mixing the soundtrack
 The Reaper Digital Audio Workstation (requires license, but includes a free trial run)
Since Reaper doesn't have a viewer for 360-degree video files, the workstation needs a VR player and a program that will sync the player with Reaper so the video and audio tracks can start and stop in sync. To accomplish this, I used the following pieces of software (both free to download):
GoPro VR Player
SpookSyncVR
3. For encoding the finished mixes for uploading to Facebook, YouTube, etc
 Facebook 360 Spatial Workstation (an incredibly reliable, cross-platform tool that includes a plugin and preset for Reaper)
Setting it All Up:
1. Converting the audio files for the workstation: The Brahma mic should be set to record 4 channels of audio. However, the raw audio files can't be encoded into a spatialized soundtrack. That's why 'conversion' is such a key part of the first step. You need to upload the sound files from your Brahma’s SD card, and use the free Brahma Volver software to convert the files into a single 4-channel track (a format called B-FuMa, which is listed on the 'Select Output Mode' option as 'B-format'. Always make sure that's the output mode you choose).
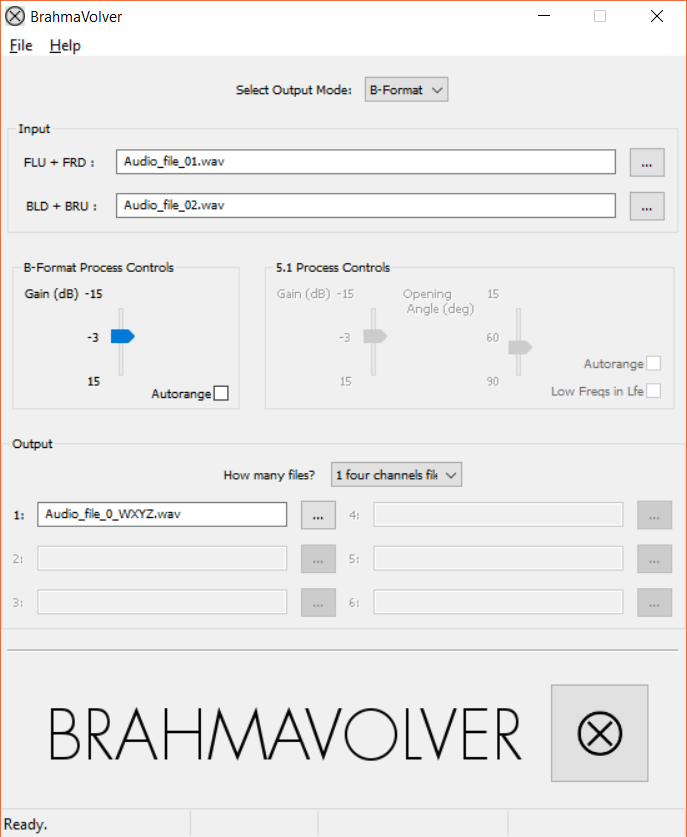
Input : FLU + FRD / BLD + BRU - Each of these 4 abbreviations represents 1 of 4 mic channels according to the direction they're positioned (FLU = Front-Left-Up, FRD = Front-Right-Down, BLD = Back-Left-Down, BRU = Back-Right-Up).Brahma records the sound in a different format (A-Format). Each take will result in two .wav files which will include a file number and either the initials 'MS' or 'XY' (i.e. SR004MS.wav and SR004XY.wav). Always be sure to match these up like so:
FLU + FRD = .wav file ending in XY
BLD + BRY = .wav file ending in MS
Output : Set “How many files?” to ‘1 four channels file’. This will populate the output window with a new audio file ending in _WXYZ.wav . Then hit the large button next to the “BRAHMAVOLVER” logo to begin the conversion. Brahma Volver will create a single 4-channel track, which we'll use for our ambisonic mix.
2. Syncing Reaper with the GoProVR Player
This part of the setup involved three steps: Configuring Reaper to receive information from another app, configuring GoProVR to send information out to another app, and setting up SpookSync to link them together.
For step one, open Reaper, click on the 'Options' toolbar, and select 'Preferences'. From the list of preferences on the left, choose 'Control/OSC/Web' and click 'Add'. Set the 'Control surface mode' to 'OSC (Open Sound Control)'. Then assign it a port number (i.e. 9000) to receive information with.
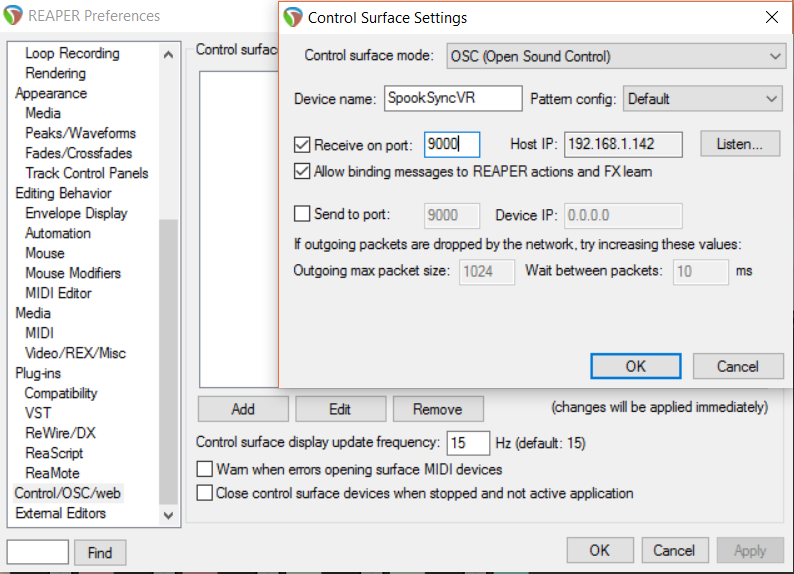
When it looks like the above, click 'OK'.
For the second step, the GoProVR player has to be set up as the sender (or 'Master'). The 'information ' it sends lets Reaper know when you start and stop the video and also what direction you're turning the video.
On the GoProVR Player's toolbar, choose "File" > "Preferences". From the list of options that come up on the left-hand side, pick "Master/Slave" and fill out the settings:
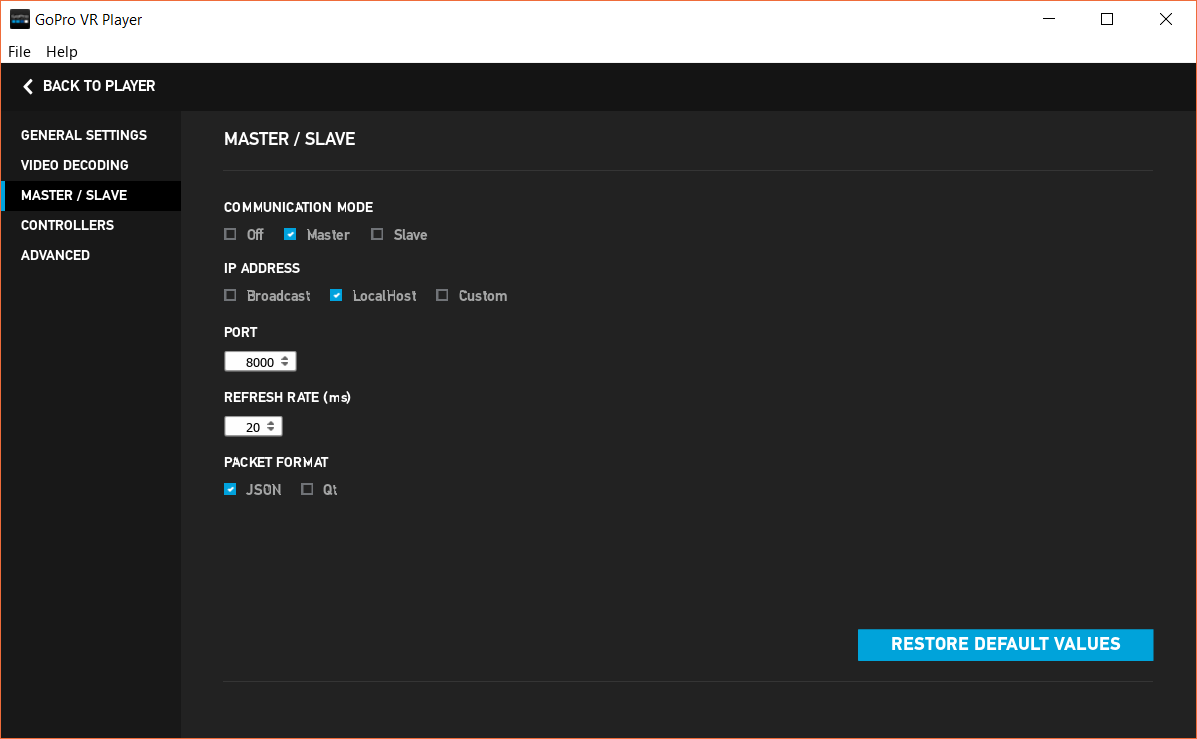
Now both apps have been assigned 'ports' (8000 for Reaper, 9000 for GoPro in this case). The last step is to link these two ports together. That's where SpookSync comes in.
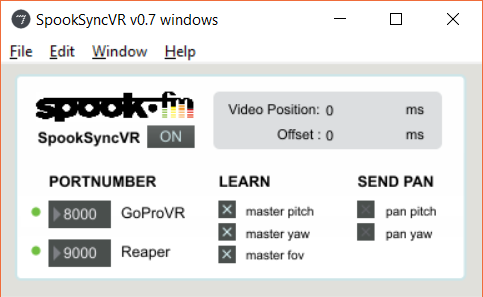
Thankfully, this is the easiest part of the process. All you need to do is make sure that the “PortNumber” section has the correct apps paired together and that the port numbers listed match the ones assigned in the previous steps (8000 for GoProVR and 9000 for Reaper).
The “On/Off” Button next to “SpookSyncVR” underneath the “Spook.fm” logo in the upper-left corner of the window will turn the synchronization between the two apps on and off. When you are editing different tracks or different portions of the audio, you will need to turn SpookSync ‘off’ to allow you freedom to work on different parts of the soundtrack.
Put it all together and what've you got?
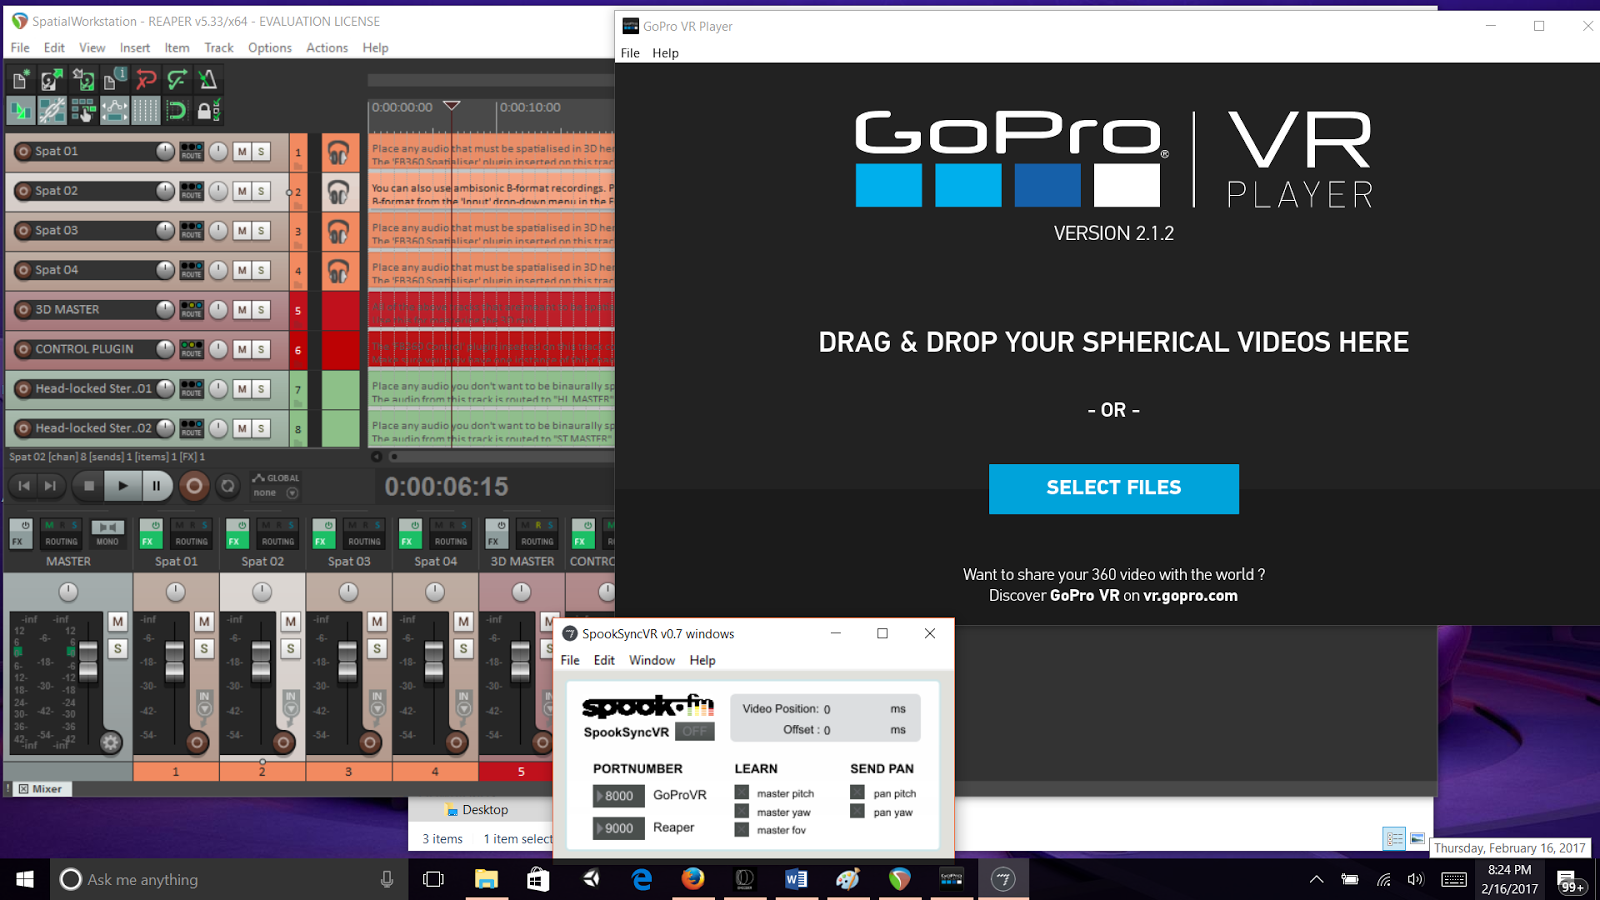
Note: In the picture above, Reaper has already been set up to the FB 360 Spatial Workstation's preset. To set it up that way, use the REAPER project file located in the directory 'FB360 Spatial Workstation' > Reaper > 'SpatialWorkstation'
And there we have our spatial audio work station! The next step will be putting it to some good use!
Next Steps
Complete an ambisonic sound mix with test video and Ambisonic audio (recorded separately)
Determine most efficient turnaround method for real-time sound edits